google search this blog, doesn't always work

Wednesday, August 31, 2011

new propane burner for the volcano stove

My first time using the volcano stove, was as a propane grill.

As I cited some problems with using it, the company contacted me and said to send the burner back for a replacement, since they believed it was defective.

There was a defect where the regulator connects to the burner, and it was also their "old style" burner.

The old style burner has an adjustable valve at the bottom, so you can adjust the flame.

I found it very difficult to adjust without burning myself, since the flame has to be on, the valve is UNDER the burner, and must be tightened by a metal thumb screw.

Anyway, they abandoned that design, and the new style burner has no such valve.

They had to eliminate the valve in order to get CSA certification, which means, meeting Canada's safety standards to be legally sold there.

So I tested the burner tonight, and found that it indeed produces a blue flame.

It also didn't have that initial huge flame burst when I lit it.

I still think there should be a way to light it from the side-- an "access hole" on the side of the stove itself-- instead of having to reach in there.

So now I need to try it as a propane grill again, and see how it works this time.

For the record, the BTU for the new burner is 19,500.

my first scones


This is the Lodge cornbread wedge pan. It can also be used to make scones.

This was the first time I ever made scones, and it was with a mix.

I used Cinnabon baking mix, available at Sam's.

Besides the box of baking mix, you also need 1 cup of whipping cream and 1 egg.

Follow the directions on the box, and you have cinnamon scones!

You can also use the mix to make cinnamon rolls, muffins, and coffee cake.

stir frying on a volcano stove


This is the Lodge wok, and it's going to be used to stir fry on the volcano stove, using coals.

To do this, you take off the top grill and just set the wok in the volcano.

You first need to light up 25 coals, and you need to put them on the CENTER PLATE, not the bottom.

Otherwise, the wok will not get hot enough to stir fry.

You'll want to have a table set up nearby, and have all the ingredients ready.

I preheated the wok and made a simple shrimp stir fry.

I used pre-cooked shrimp*, onions, garlic, mushrooms, bean sprouts, water chestnuts, shredded cabbage, and peanuts.

*You can use raw shrimp if you want to; it just takes longer.

I added soy sauce and five spice for seasoning.

It was my first time ever stir frying over coals.

If you don't have a volcano, a propane stove will also work, or you can set the wok on a trivet over the coals.

You will probably need more coals if you're not using the volcano, since it's "fuel efficient".


Monday, August 29, 2011

Using the 8 inch square pan on the stove burner

This is a cast iron 8 inch square cake pan.

I was just demonstrating that it can be used on the stovetop, as a small skillet.

I actually used it after this photo was taken, to make a base for a seafood chowder.

To make a base, you melt 2 tbsp butter in the pan, then whisk in 2 tbsp flour, and then about 2 cups milk.

This is also a base for gravy, but what you want is a thick paste, which you then add to your chowder.

Sunday, August 28, 2011

Finally found a recipe for the 8 inch square baking pan

This is a cast iron 8 inch square baking pan. Lodge doesn't make one; It's by Old Mountain.

I was seeking out recipes specifically for an 8 inch square pan, just so I would actually use this pan.

The volume is about 1 1/2 quarts; any recipe calling for this size pan, can be made in a 9 inch skillet.

The Lodge 36 oz oval server, can also be used to make most recipes meant for this pan-- although in some cases, you might have a tiny bit left over.

So I found the following breakfast recipe, which I modified based on what I had available:

Mix 3/4 cup bisquick, 1/2 cup milk, salt, pepper, dry mustard, and 6 eggs in a bowl. Whisk.

Add chopped ham and shredded cheese. The recipe called for swiss, but I just had mozzarella.

The recipe also called for sliced mushrooms and chopped tomatoes, but I didn't have any.

Pour into the pan and bake at 350.

I should have sprinkled some of the shredded cheese on top before baking, instead of mixing it all in.

I also should have added bacon bits!

It was a little dry; I'm sure adding the chopped tomatoes and mushrooms would have made it better, but I didn't have any.

I topped with parmesan cheese afterwards, and some bacon salt.


Friday, August 26, 2011

my first real enchiladas

Before today, I've always made my enchiladas with flour tortillas, since I like them better than corn.

But they weren't "true" enchiladas, since enchiladas are made with corn tortillas.

I decided to make real enchiladas tonight in the Lodge 12 inch skillet.

I filled the tortillas with monterey jack and white american cheese.

In some of them, I added a spoonful of pinto beans.

I packed the filled tortillas side by side in the skillet, then folded the tops closed, and turned them over with the folded side down. That's how they stay closed, without a toothpick.

Then I grated some cheddar cheese on top, and poured over enchilada sauce from a can.

Into the oven at 350.

I thought they were fantastic.

Some prefer them to be filled with cheddar instead of american, but I don't like the way cheddar melts.

Alternative cleaning solutions for the Scooba


I realize my blog is titled "ramblings on cast iron" and not "ramblings on floor cleaning", but I decided to deviate for a minute.

This is a Scooba, which is an automatic floor scrubber.

I have "almost whole house" ceramic tile, so I got one.

One of the main complaints is about the proprietary cleaning solution.

It's not only expensive; it doesn't clean.

There used to be a "clorox" solution, which did clean very well. That solution was discontinued and is now VERY expensive.

Now there's this "natural enzyme cleaner", which is environmentally friendly and useless.

But the problem is, you can't use just ANY cleaner in the Scooba!

Some contain oil that can clog it up.

Some leave a sticky residue inside, which will ruin it.

Some will cause it to not start at all.

Some contain bleach or ammonia, which will dissolve the internal rubber parts.

After some extensive online research, and after trying a few of the suggestions myself, here are my recommendations:

Each of these solutions must be diluted with water; the tank holds approximately 1 quart.

Some solutions are 1.5 oz per tank, and some are HALF oz per tank.

1. Armstrong tile and vinyl floor cleaner, which is blue, and available at Wal-mart. 1.5 oz per tank.

2. Mr. Clean multi-surface anti bacterial*, which is yellow, available at Lowe's. HALF oz per tank.

*IMPORTANT! Be sure you use the kind WITHOUT Febreeze or Gain. Just plain Mr. Clean.

3. Proforce no rinse floor cleaner, which is pink, and sold only at Sam's. HALF oz per tank.

4. Fabuloso*, in different colors, available at Wal-mart. 1.5 oz per tank.

*Be sure you use the kind WITHOUT bleach or OXY.

5. Simple green*, which is green of course, available at Wal-mart. HALF oz per tank.

*Lemon scented simple green also works.

6. Ajax fresh*, which is green, available at Wal-mart. 1.5 oz per tank.

*Not regular Ajax-- Ajax fresh, WITHOUT ammonia or bleach.

7. Spic and Span, which is orange, available at Wal-mart. HALF oz per tank.

You may also find those products (except the Proforce) in your local grocery store.

If I find any others, I'll let you know.

Apparently there's a special Mr. Clean Finished Floor cleaner, only available at Sam's, that is "safe for automatic floor scrubbers".

I have not tried that one, since it's not at my local Sam's, and I've found plenty of others to use.

Using alternative solutions does void your warranty, so please be cautious.

I'm just giving you the ones I've personally tested and know to work, and others have reported using for an extended time without damage.

Keep in mind, my scooba is regular sized; I don't have the smaller 230, and never will. So I cannot know, if these are OK for a 230 or not.

Personally, I don't recommend the smaller one. The regular sized one is more robust and does a better job cleaning.


Thursday, August 25, 2011

that fool ebay seller!

I scout ebay listings daily, for Lodge brand cast iron cookware, in hopes of finding a good deal on discontinued models.

And there's this one fool seller, who persistently lists Old Mountain brand cookware, with Lodge in the title.

I have personally contacted this seller; He stated that he purposely puts Lodge in the title, so it will come up in more searches.

That's a practice called "keyword spamming", and it violates ebay rules.

It's also copyright infringement, since Lodge is a registered trademark, and is illegal.

Of course I know better, but an unsuspecting customer could be misled to think he is buying a Lodge product.

I have made numerous reports to ebay, yet nothing has been done, despite their written policy.

So, I am posting this article, advising my readers not to buy anything from ebay seller linxwiler123.

If you search on ebay for Lodge cast iron, enter the keywords "lodge cast -mountain".

That search will list the actual Lodge products, and omit the listings from this seller.


Tuesday, August 23, 2011

you don't necessarily need a camp oven with legs on a volcano

I'm not actually cooking anything in this pot; the photo is for demonstration purposes only.

I discovered tonight that, if you are using a 12 inch dutch oven, you don't necessarily need one with legs.

The coals are on the bottom, and the volcano suspends the pot up over the coals.

Note that only applies to a 12 inch oven.

Now, if you're putting the coals on the center plate, then yes, you do need a camp oven with legs to hold it over the coals.

But, not if the coals are on the bottom of the grill***, as you can see.

***If the coals are on the bottom of the grill, then you will need a lot more coals, than if you're putting the coals on the center plate.

***Unfortunately, there is no information as to how many coals you need, if you're using coals on the bottom. And very limited information, if the coals are on the center plate.

***So, unless you feel like experimenting with how many coals you need, in order to cook with coals on the very bottom-- skip this idea.

***Or if you want to slow cook on low heat. I can tell you from my own experience, that 25 coals on the very bottom made the temperature around 250.


my first attempt at cooking in a camp oven with coals on a volcano


***UPDATE: When I tried this, I had not realized that the coals need to be on the CENTER PLATE, not on the bottom of the grill. That's why the pot didn't get hot enough and I had to add more coals.

***Nowhere in any manual or website is it made clear that you need to do this, so, learn from my experience.

For my first time using the volcano to cook in a camp oven with coals, I decided to "stick to what I know."

So what I made tonight is very similar to this recipe and this recipe, both of which I made a year ago.

It's also similar to this recipe, which I didn't actually make, but I submitted it to an online contest.

Cut up some shoulder roast*, and brown in butter.

*Actually, chuck roast is better. I should have used that.

Add fresh mushrooms, chopped onions, minced garlic, canned potatoes, canned carrots*, cream of mushroom soup diluted in milk, worcestershire sauce, seasoned salt, and bacon bits.

*You could use cut up fresh potatoes and carrots, but it will take longer to cook.

I previously mentioned that in a volcano stove, you use less coals than you normally would, and you don't use top heat unless you're baking*.

*Sorry, I disagree with the "no top heat" claim. I explain why later in this article.

Now, I was told that for the average dish, cooked in a 12 inch camp oven over medium heat, you need about 13 coals (for 350 degrees, all on bottom*.

*They need to be on the center plate, not the bottom of the grill. Otherwise it will not get hot enough.

But in order to brown your meat before adding the other ingredients, you need to start out with more coals on the bottom, and then remove them.

So I started with 16 coals. I quickly realized that I needed more*, so I added 9 for a total of 25.

*If the coals had been on the center plate, that might have been enough.

When the meat was browned, I added the remaining ingredients, then removed the coals until the number on the bottom was 13.

I don't know how 13 coals could ever equal 350 degrees; My infrared thermometer was reading 200. I could touch the lid without even using gloves!*

*Because the coals were on the bottom, instead of on the center plate.

I realize that number is subject to adjustment for altitude, but I live in Midland Texas, not on top of the Rocky Mountains*.

*It was because I put the coals on the bottom, instead of on the center plate.

So I put the original coals back, bringing the number back to 25. The thermometer averaged 250.

As the food appeared to be simmering well, I just left it alone, but I started another batch of coals anyway, in case some needed to be replaced.

If I were not using the volcano stove, then the number of coals needed would be 16 on top, 8 on bottom, for a total of 24.

I just checked it and added some Wondra flour to thicken. I'm going to let it simmer for a while longer and then take it off.

I ended up not needing that other batch of coals I lit, but it's always a good idea to have some on hand in case you need to replace coals that are burning out.

Usually it's easy to monitor the coals and swap them out as needed; In the volcano, you have to lift out the pot, which can be a hassle.

Frankly, I don't buy the "no top heat needed" claim, since you need more heat on top than on bottom for that "slow cook oven" effect.

It's impossible to have more heat on top, when there are no coals on top.

The recipe worked, but didn't have that special flavor that comes from a slow cooked oven.

So, if you're going to do this, put some coals on top anyway. Unfortunately, there's no information as to how many on top vs bottom*.

*Use about 90% less. Buy an infrared thermometer to monitor the temp.

This is definitely a "teach yourself" appliance.

Which is why I'm trying to compile some solid guidelines on my blog, based on my own experience, because there's just so very little information out there, outside of "hype".

Lipton onion soup mix would rock in this dish. And it's not to late to add it...


Monday, August 22, 2011

question about woks

I was asked a question today that I could not answer, but thanks to Lodge cast iron company for coming to my rescue!

The question was, what's the difference between a cast iron wok, and a carbon steel wok?

Besides the obvious fact that they are made of different material-- how do they perform?

Some people swear by carbon steel as the best kind of wok. I've only used cast iron.

Cast iron woks take a little longer to heat up than carbon steel.

Once it does heat up, the heat is more consistent, and you don't have to shake it while cooking.

As I've never used a carbon steel wok, I can't personally comment on how well they work.

I can say that I love my Lodge cast iron wok, and wouldn't trade it for anything else!

Sunday, August 21, 2011

Can you grill fish directly on a volcano stove?

On a standard grill, you can't really grill fish directly on the grill, because fish "flakes," and chunks can fall between the grates when you turn it.

Instead, you either wrap the fish in aluminum foil, or use a grill basket or fish plank.

The Lodge sportsman's grill eliminates this problem, because the spaces between the grates are only 5/16 of an inch.

Yes, I'm a nerd, and I measured: The volcano grill's spaces are just under 1/2 inch.

Which is smaller than a standard grill, but larger than the Lodge sportsman's grill.

So, since I had some charcoal to use up, and some fish to cook, I decided to see if fish can be cooked directly on the volcano.

This was salmon fillets, which I seasoned with cumin, coriander and cilantro.

It was the first time I tried that seasoning on salmon.

There was some minor flaking, which is unavoidable, but no big chunks were lost in the grill.

But some fish is more delicate than salmon, and will flake more.

So if you're still worried, go ahead and use aluminum foil, or a basket or plank.

Trying to make sense of the volcano stove and coals


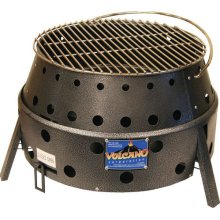
The volcano stove is of course, an outdoor stove as well as a grill.

However, there is a third function which is its market niche: cooking with a camp oven and coals.

With the volcano, instead of having your coals exposed, you put the coals in the volcano and slide your camp oven inside.

It can hold a camp oven up to 12 inches wide.

However, apparently using coals in a volcano is completely different from the traditional method.

In other words, the traditional coal chart does not apply, due to the shape and design of the volcano.

It distributes heat along the sides of the camp oven, and is more fuel efficient; therefore the number and placement of coals, is not the same.

I've been reading the volcano cookbook and technical manual which attempts to explain the differences, and trying to make heads or tails of it, for months now. It's very confusing for the lay person.

What I CAN get from it is, you don't need top heat unless you're baking or browning*, and you use less coals than you normally would.

*After trying it out for myself, I'm going to disagree with the "no top heat needed" claim. Yes, you need top heat. Unfortunately, there's no information on how many coals on top vs bottom.

I also get that you can control the heat by opening and closing the vents. Open is hottest, 50% is middle, and closed is least hot.

There's also a "center plate" that you can use or not use*, that diffuses heat for lower temperatures**.

*Apparently, you do need the center plate when cooking with coals. You put the coals, and the camp oven, ON the center plate.

**The plate is used as a heat diffuser when you're using propane, and as a base when you're using charcoal.

But there's no coal temperature chart at all. No way to convert recipes from traditional coal placement, to placement of coals in the volcano.

So I contacted the company in an attempt to get some real info that I can possibly use.

What they could tell me was, for a 12 inch camp oven, 350 degrees (or medium heat) is about 13 coals on bottom*; none on top, unless baking or browning.

*This number is assuming you put the coals on the CENTER PLATE, not on the very bottom of the stove. I figured that out, when 13 coals barely reached 200 degrees.

**This is also subject to adjustment for altitude. Buy an infrared thermometer and check yourself.

***Yes, you do need top heat, based on my experience.

But what about for smaller camp ovens? The book says to place the coals on the center plate for smaller ovens, but not how many to use.

What about deep camp ovens? Do you use the same amount of coals as for standard sized camp ovens?

And what if you're baking or browning? How many coals on top vs. how many on bottom?

When I asked about specific information, they told me to "just experiment".

That's great if you've already mastered the traditional method of coal cooking, and know what you're doing.

But frankly... "Forget everything you've learned-- this is completely different. We can't tell you what the new method is exactly. Figure it out," will certainly frustrate and discourage the average consumer.

So the best I can tell you is, there are cookbooks* and recipes online, that are specifically for the camp oven used in the volcano**.

*Actually, two cookbooks that I know of: The technical manual I've already mentioned, and "volcano magic".

**The dutch oven cookbooks by Colleen Sloan, such as Log Cabin Grub, have some recipes that tell you the coals needed if you're using a volcano.

Either use those recipes, or just use recipes calling for a standard 12 inch camp oven at 350 degrees-- or "medium heat"-- and use about 13 coals*, on the CENTER PLATE.

*Subject to adjustment for altitude. Use an infrared thermometer to monitor temperature.

As there's a lot of hype all over the internet about how great the volcano is, I'm probably going to get some flak for posting this article, as I did the first one.

But as I've said before, this blog was never meant to be "hype" or "advertising".

I post my personal experience exactly as it happened, and if it's not perfect, then it's just not.

***UPDATE: They later got back to me with some more solid info.

25% less coals than you would normally put on top, and put them all on bottom.

In other words, for a 12 inch oven, normally 16 on top and 8 on bottom, based on the traditional coal chart; Put 12 or 13, on bottom only.

None on top unless baking or browning*, in which case you would use about 80% less total coals, distributed 2/3 on top and 1/3 on bottom.

*I disagree. Use top heat all the time.

In other words, for a 12 inch oven, normally 16 on top and 8 on bottom; Put 13 on top, 5 on bottom.

Then I found a boy scout resource that said, for an 8 inch oven, use 8 to 10 coals on the bottom for medium heat; For a 10 inch, 9 to 11 coals; and for 12 inch, 10 to 12 coals.

That resource corroborates with the info I was given. So, now I have something we can work with here.

Please note, this amount of coals assumes you are putting the coals on the CENTER PLATE, not the bottom.

They were never specific about this detail; I learned the hard way.

Saturday, August 20, 2011

My third experience with the volcano stove

So I decided to try the volcano stove as a charcoal grill, for bratwurst and corn on the cob.

I soaked the brats in beer for about 30 minutes before grilling. It was a shortcut from my usual recipe.

I first set up the volcano by placing the "bottom grill" on the bottom, to put the charcoal on.

Then I lit the coals in my charcoal starter, waited for them to be ready, and poured them in.

When I put on the top grill, I immediately realized that I'd made a mistake. The food would be a lot higher than the coals; you want them to be closer for grilling.

I should have put the center heat deflector plate in place, and put the coals on that.

They used to have a "middle grill", sold separately, that was used for charcoal grilling, but it's been discontinued.*

*I emailed the company to ask where I can get one, or if I can get one. Apparently they'll be back in stock next month.

So instead of trying to handle hot coals, I solved the heat issue by covering the food, using a cast iron skillet as a makeshift lid.

The company does sell a "volcano lid," which is a tent looking thing, to cover the food and retain heat.

There is no "lip" around the top grill, so you need to be careful to keep food from rolling off.

Other than that, it's fine as a charcoal grill.

Contrary to what I've read about it, the outside is not "cool to the touch." It won't harm you if you touch it, but it's still hot.

You can still use it on tabletops though. The legs get warm, but not hot enough to melt anything.


My second experience with the volcano stove

The volcano stove can be used with wood, charcoal, or propane, and can be used as a stove, a camp oven cooker, or a grill.

My first experience was a few days ago, when I tried it as a propane grill.

The company immediately contacted me, convinced that the problems I was having was due to the attachment being defective.

So they offered to replace it. When I get the new one, I'll try it again and see if I have the same issues.

So since I don't have the propane attachment right now, I decided to try it with wood.

See, I've got a stack of firewood in my backyard, that I'd like to get rid of.

I figured using it in the volcano would serve that purpose, so I proceeded to set it up as a wood grill.

I immediately noticed that the branches were too big to fit; The volcano is 13 inches wide.

So to use wood in this, you have to cut the pieces to 12 inches or smaller.

I don't have a hatchet. I started to use a saw, and decided that it was taking too long.

So now I'm just going to use it with charcoal.

Be it known, that you absolutely CAN use wood in the volcano stove. "Yes, you can!" "Si, se puede!"

I'm just not going to, not when I have charcoal readily available. In fact, that's why it was invented!

Anyway, if you want to use wood, you need to cut your pieces to 12 inches or smaller so they'll fit.

For that matter, any charcoal grill can be used with wood. Most people don't, because it's more work.

However some people prefer the way food tastes, cooked with wood over charcoal. Up to you.

Friday, August 19, 2011

salmon pan fried with coriander

I saw a blurb online where someone was frying salmon fillets in a pan, seasoned with coriander.

There are lots of recipes for "coriander salmon" which are more fancy, but I was in a hurry tonight, so I just seasoned mine with dried coriander and black pepper.

I'm sure fresh coriander would have been wonderful, though.

Sprayed the cast iron skillet with olive oil pam, and fried the salmon in the pan.

Salmon isn't my favorite thing, but it's good for me, so I eat it. I'm always looking for creative ways to make it better.

Thursday, August 18, 2011

modified version of my friend's pasta

The following recipe is a modified version of a friend's pasta recipe.

It's very similar to the shrimp pasta I recently made.

In olive oil, I sauteed some canned crab meat, minced garlic, and fresh thyme. Added bacon bits.

Then poured over leftover spaghetti.

I should have cut up the thyme sprigs before sauteing. They were a little too long to eat without looking like a grazing horse.

Wednesday, August 17, 2011

Fajitas for everybody

This is actually not my recipe, or my photo. It was posted on facebook, and I got permission to reprint.

We all know that cast iron is great for fajitas; usually the meat and veggies are made in separate skillets.

It never occurred to me that you can use the Lodge 15 inch skillet*, and make your entire fajita mix in the pan at once!

*The 17 inch skillet would work too, if you have a crowd.

The posted recipe was: Brown sliced sirloin in light olive oil; Season with steak seasoning.

Then add fajita mix* and 1/2 cup water; Add sliced bell peppers and onions. Saute on medium heat until done.

*I assume "fajita mix" is the seasoning mix you can buy in packets at the grocery store.

This way, all the meat and veggies are sauced and tossed together and you can just spoon on the tortillas.

Now, I don't like peppers at all. So, how do you make fajitas without bell peppers?

Simple, I substitute zucchini, tomatoes, mushrooms and garlic cloves. Granted that's not true fajitas, but it works for me!

Monday, August 15, 2011

My first use of the volcano stove


The volcano stove is hyped as a wonderful tool for outdoor cooking.

It can be fueled with wood, charcoal or propane, and can be used as a stove or as a hibachi style grill.

It's popular among those who cook with a camp oven over coals, because you can remove the grill part and place your camp oven inside.

It's designed to fit the 12 inch camp oven, which is the most commonly used size.

This was my first time using the volcano stove. I used propane as the fuel, using it as a grill for steaks.

In order to use propane with this, you need a special propane attachment, which is sold separately. You need a crescent wrench to attach and detach it.

The steak recipe I used, I discovered at the grocery store, where they were handing out free samples of steak marinated in Pecos 83 BBQ marinade, and seasoned with Adams Reserve Southwest Ancho rub.

I grilled the steaks just as I would on any other grill.

I can't say I'm impressed with the volcano as a propane grill.

It works, and would no doubt be useful in an emergency, but would not be my first choice otherwise.

The flame was difficult to control and there were a lot of flare ups*, contrary to what the product website claims.

*It was later suggested that I adjust the flame on the bottom of the burner. So I tried that, but was never able to get a blue flame**, no matter how I adjusted it.

**Propane burners are supposed to emit a blue flame. Orange flames are cooler and less efficient. The flame was mostly orange, except for one adjustment in which the flame was white.

I closed the vents, which helped with the flare ups, but the flame remained orange.

There are two levers, and both close all the vents at once. Left is closed, right is open.

Now, with steaks, you want the fire to be hot in order to sear the steak. So I wonder if the vents are supposed to be closed when grilling steak?

I haven't tried it as a propane stove yet. My suspicion is that, although it's possible to use as a grill, it's better suited for use as a stove.

But I already have a propane stove.

And I don't like that there's no safe way to light the burner, from the side. You have to stick your hand in there, and I nearly got burned by the flame.

So I removed the propane attachment, which was a disappointment, since I bought this in order to use propane with my camp ovens*.

*Not recommended. Read my article to find out why.

I still intend to try it with my camp oven, since that's supposed to be its niche, but I'll use coals.

It has the advantage of being able to use coals anywhere, since the outside is cool to the touch; It's legal to use in areas where fire is prohibited.

So in other words, this is a glorified fire pit.

The ability to use propane sounded like a great feature, but didn't meet my expectations*.

*The company has offered to replace the propane burner and regulator, so we'll see how that works out.

Saturday, August 13, 2011

maple bacon pancakes

On a website called baconfreak.com, they sell a variety of bacon flavored stuff.

One thing you can get is maple bacon pancake mix, to make maple bacon pancakes.

I quickly discovered that it's basically pancake mix, with bacon bits in it.

So, I could have easily made my own, but it was still fun to try.

I made them this morning on my Lodge cast iron griddle.

You can put all kinds of things in pancakes: bacon bits, pecans, walnuts, small pieces of fruit.

I discovered that the bacon bits made the pancakes much thicker, which is fine with me because I like thick pancakes.

Add more water if you want them thinner; I wouldn't.

Friday, August 12, 2011

sweet and sour wings

This recipe is from a crock pot cookbook, but I used a 5 quart cast iron pot in the oven at 250.

First you mix the sauce in the pot:

1 cup packed brown sugar, 1/4 cup flour, 1/2 cup beef broth, 1/4 cup white vinegar, then add ketchup, soy sauce, garlic powder, onion flakes, and mustard.

Stir together and heat until thickened. I added a little water to deglaze the pot.

Then added the wings. I used drummettes because I like them better, but you can use whole wings.

Slow roasted covered, for 5 or 6 hours.

They were falling off the bone and tasty!


Wednesday, August 10, 2011

Grilling fish on the Lodge sportsman's grill


You can grill fish and veggies on this, because the spaces are more narrow than on a conventional grill.

I used it tonight to grill some orange roughy fillets, which I'd never made before.

I was told years ago that "it's great on the grill", so I decided to try it.

You can use a wide variety of seasonings on orange roughy, such as oregano or cajun seasoning. I used lemon pepper, then sprayed on olive oil.

You need a large spatula for grilling fish; Tongs and forks don't work well.

I have to say, orange roughy fillets really are great on the grill!

I also grilled a couple of ears of corn.

That's best done with the corn brushed with olive oil and wrapped in aluminum foil, although some grill it "in the husk".